Most businesses whether they are small start ups from home or large corporates need a logo to be identifiable in the market.
Logos are a quick way to establish brand recognition. Logos can give customers a quick insight or impression into a product or service. Sometimes a logo icon and brand name can be clarified by use of a bi-line.
Logos are versatile for use on products, business cards, car signage, large and small signage and everything in between. Consistency is the key.
Social platforms often need a logo that works inside a circle shape – the ideal way to display the logo is a logo icon or simple recognisable aspect of your brand – this application doesn’t then work across the whole spread of how your logo may need to be used, eg print, signage, digital advertising. At Graphix, we design your logo with this in mind. Generally, a horizontal logo is designed to allow for websites, and a stacked version could be developed for use in labels or brochures, etc.
Ideally, we would like logos provided to be high-resolution, preferably in vector format (PDF, AI, or EPS are the most common forms). This enables you to successfully use your logo at any scale and can be adjusted to work on any coloured background, etc if needed. Vector means it is created in shapes rather than in pixels.
However, if you don’t have a logo in this format, talk to us, and we may be able to work around this. Depending on the application, we can do our best to work with whatever logo format you have.
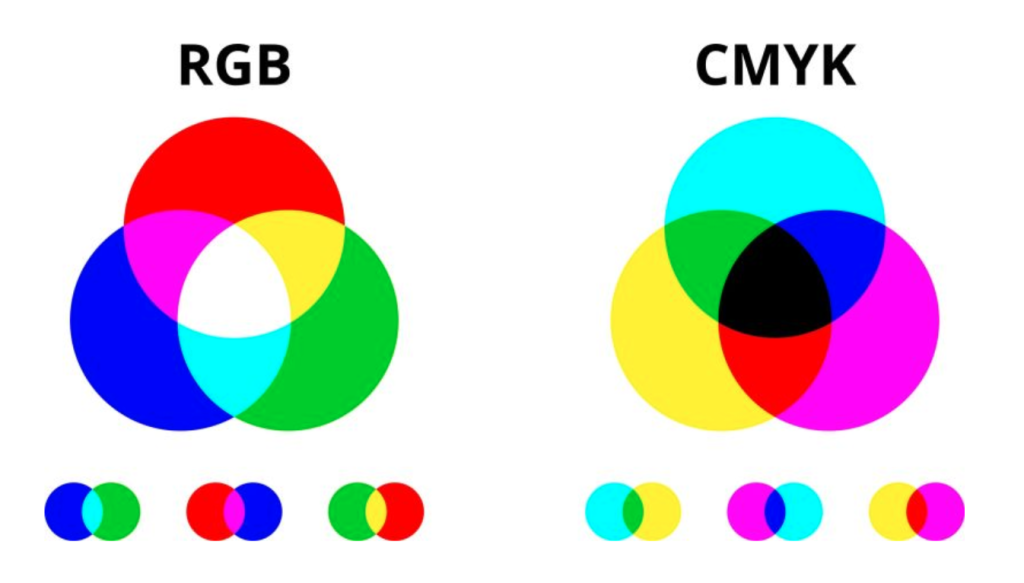
Computers use RGB (red, green and blue) light to display colours on the screen, while printers use CMYK (cyan, magenta, yellow and black) ink to print colours. Because of this, colours appear slightly different on paper than on the computer.
What you see on the computer cannot always be reproduced perfectly on a printed product. If an exact colour match is essential to your project, a physical sample will be required, or a PMS colour. The colours on the computer appear different because the monitor emits light, while the printed product reflects light. Understanding this difference will help improve the outcome of your project.
- Social Media
JPEG files are the files you will need for your socials. Think of them as images. They are made to the dimensions suitable for social media
- Website
PNG files are files with transparent backgrounds to pop over images. Like a watermark. Preferred for web use.
- Print and Signage
PDF files are the print ready files. Most manufacturers prefer this type of file. It also retains its vector format.
- Company Logo Banner: A large banner featuring your company's logo prominently. It helps create brand awareness and establishes your presence at the expo.
- Backdrop Banner: A backdrop banner placed behind your booth or display area. It can include your logo, tagline, and key visuals representing your brand. This banner sets the overall tone and theme for your exhibit.
- Product Showcase Banners: Create banners that highlight your key products or
services. Include high-quality images, product names, and key features or benefits.
These banners can draw attention and generate interest from attendees. - Informational Banners: Provide banners that educate attendees about your company, its history, mission, or unique selling points. These banners can include infographics, statistics, or key messages to engage visitors.
- Promotional Banners: Design banners that promote special offers, discounts, or
giveaways available exclusively at the expo. Incorporate clear calls-to-action and
enticing visuals to attract potential customers. - Testimonial Banners: Consider banners featuring positive testimonials from satisfied customers. These banners can build trust and credibility, showcasing real-life experiences and recommendations.
- Interactive Banners: Incorporate interactive elements like QR codes or augmented reality (AR) features to engage attendees. These banners can direct visitors to your website, social media profiles, or interactive demos.
- Schedule or Agenda Banners: If you have specific presentations, demos, or events scheduled, create banners that display the timetable or agenda. This helps attendees plan their visit and encourages them to attend your sessions.
- Directional Banners: To guide attendees to your booth, place banners with clear directional cues, such as arrows or "Visit Us" signs. These banners can be placed strategically throughout the expo venue.
- Standee Banners: Consider standee banners that can be placed at the entrance of your booth or around the expo area to create additional visibility. These standalone banners can feature captivating visuals and key information.
Yes, we'd prefer you to check you are happy with the final colour, stock and size in person. As it can look so different on a screen. We can courier it out to you for a small additional cost as well.
A0 = 841 x 1189 mm
A1 = 594 x 841 mm
A2 = 420 x 594 mm
A3 = 297 x 420 mm
A4 = 210 x 297 mm
A5 = 148 x 210 mm
A6 = 105 x 148 mm
DLE = 99 x 210 mm
Business Cards = 55 x 90 mm
We offer a range of printing methods, including digital printing for short runs and quick turnarounds, offset printing for high-quality and cost-effective large volume runs, and large format printing for banners, posters and signage. As well as a huge range of promotional items that can be personalised.
Digital printing is ideal for small to medium runs, where quick turnaround and variable data printing are needed. Offset printing is better suited for large runs, where the setup costs are spread over a higher quantity, resulting in a lower per-unit cost and higher image quality.
Yes, we offer eco-friendly printing options, including the use of FSC-certified papers and recycled papers. We also utilise digital printing methods that minimise waste and reduce chemical usage.
Yes, we can print on a variety of materials, including vinyl, canvas, banner material, corflute, ACM (Aluminium Composite Material), and more. We have specialised equipment for printing on various substrates, tailored to meet your specific needs.
We can print everything from small stickers to large-format prints like posters, banners, and wallpaper. Our large-format printers can handle widths up to 1500mm by any length.
The cost is influenced by several factors, including the type of printing method, the quantity, paper type, size, number of colours, finishing options, and any special requirements like embossing or die-cutting.
Yes, we can provide a detailed quote based on the specifications of your project. Please provide details such as the type of product, size, quantity, paper type, colour requirements, and any finishing options.
Turnaround times vary depending on the complexity and volume of the job. Standard digital print jobs have a 3-day turnaround, Offset and more complex jobs have a 10-day turnaround, backed by our ‘Right First Time & On Time – Guarantee’.
Yes, we do charge a rush fee for expedited orders to prioritise your job and ensure it meets your tight deadlines. The fee varies based on the complexity and urgency of the job.
Yes, we offer volume discounts for larger orders. The discount amount depends on the quantity ordered and the type of printing service required. Please contact us for specific pricing.
Yes, we offer graphic design services to help create or adjust your files to be print-ready. Our design team can assist with layout, text, image placement, and overall design to ensure optimal print quality.
Yes, we provide both digital proofs and physical proofs upon request. Reviewing a proof allows you to check for any errors or adjustments before the full print run, ensuring your satisfaction with the final product.
If there are any issues with your files, we will contact you immediately to discuss the necessary corrections. We want to ensure your job is printed accurately, so we may recommend adjustments or ask for a revised file.
We offer a wide range of paper types, including uncoated, matte, glossy, recycled, and specialty papers like linen and parchment. We also have various weights available, from lightweight to heavy cardstock.
We offer several finishing options, including laminating, UV coating, embossing, debossing, foil stamping, die-cutting, and more. Each option adds a different effect or protection to your printed materials.
We offer various binding options, including saddle stitching, perfect binding, spiral binding, wire-o binding, and case binding. The best option depends on the number of pages, desired durability, and presentation style.
Yes, we can match specific colours using Pantone colour matching or CMYK process colours to ensure brand consistency and accuracy in your printed materials. Please provide us with your colour specifications.
Yes, we offer additional services, including direct mail fulfilment and mailbox distribution. We can handle your project from print to delivery, ensuring a seamless process.
A canvas print can be the statement decor your room is missing, yet if the size isn’t right, something will feel off. Too small and your room can look incomplete, too big and the room can feel a little too crowded.
Here are our top tips to get the sizing just right:
- A great way to help you visualise it in the room is simply by outlining different potential dimensions with painter’s tape, sticky notes or paper. You can then take a step back to take it all in.
- Wall art should take up 60%- 75% of the available wall space, i.e wall space that isn’t covered by furniture. Start by measuring the width and height of your wall, and then multiply them by both 0.60 and 0.75. This will give you a range of canvas print sizes that will suit the space.
- When hanging wall art over furniture, such as a bed, a fireplace or a couch, it should be between 2/3 to 3/4 of the width of the furniture. You can do a similar calculation here for measuring the ideal canvas size above your couch, for example.
- If you have smaller prints - not to worry either! You can hang them in a smaller area, place them side by side, or you can group them together to create an eye-catching gallery wall- we print based on the uploaded image dimensions to ensure the best quality of print. So, if you print a portrait-oriented photo, it may be best suited for a narrower wall, whereas a landscape-oriented photo may fit perfectly above the sofa or bed.
Footpath signs (Visual area 720 x 600mm) are ideal if you have retail premises or if your customers regularly visit you. Use them to advertise your full range of services or to announce special offers and promotions. A customisable A-Frame with a powder-coated black finish comes in two sizes. Available 600 x 1000mm or 800 x 1200mm. Panels are ACM (aluminium composite material) and they can be interchanged or fixed into position. Talk to us about pricing and how this product can work for you.
The most popular size is 850mm x 2000mm. Other sizes also available: 1000mm, 1200mm and 1500mm wide by 2000mm high. They come complete with a sturdy canvas bag for easy transportation and, if they are treated with care, can be used again and again.
A JPEG is a version of a logo that is like a picture – It has a maximum size based on file size that it will produce well at, after which it will look low resolution and blurry. A JPEG is also not the most accurate colour match, as you can’t have spot colours in a JPEG.
Don’t worry, if you have files you can’t open or are unsure about, it’s best to send them all to the designer. They can determine which ones are relevant and work with them.
Yes, it’s a good practice to compress larger files into a Zip archive before sending. This makes it easier to transmit and ensures that the designer receives the files intact.
Use a secure file-sharing platform or email encryption if dealing with sensitive content. Check with your designer for their preferred secure method.
File size limitations vary depending on the transfer method. Always check with your designer or the platform you’re using to ensure your files are within the allowed size.
Yes, be sure to provide clear instructions, such as the purpose of the files, any specific design guidelines, and your contact information. This helps the designer understand your needs better.
While some social media platforms allow file sharing, it’s generally not recommended for professional design work. Stick to email or dedicated file-sharing services for a more reliable and organised approach.
Vinyl Stickers:
- Outdoor signage and advertising
- Car and vehicle graphics
- Wall and window decals and murals
- Product labelling and branding
- Safety and warning signs
Paper Stickers:
- Product branding and packaging
- Retail and promotional signage
- Event and party decorations
- Labelling and organising
- Scrapbooking and crafting
It is best to use a label that is durable, moisture-resistant, and can withstand low temperatures without cracking or falling off. Some of the best options include:
- Vinyl labels: Vinyl is a durable material that can withstand cold temperatures and moisture.
- Polyester labels: Polyester labels are known for their strength, durability, and resistance to extreme temperatures.
- Polypropylene labels: Polypropylene labels are moisture-resistant and can withstand low temperatures.
- Laminated paper labels: Laminated paper labels are coated with a protective film that helps to prevent moisture and cold damage.
It is important to choose a label material that is compatible with the surface of the bottle and any regulations or requirements for labelling in cold environments. In addition, it's important to consider the type of adhesive used on the label, as it should be able to stick well in cold temperatures without losing adhesion over time.
Yes, there are different kinds of stickers to go on different substrates. The type of sticker used depends on the surface and conditions of the substrate, as well as the specific requirements and intended use of the sticker. Some common types of stickers and their suitable substrates include:
- Vinyl stickers: Vinyl stickers are durable and versatile, making them suitable for a wide range of substrates, including metal, plastic, glass, and painted surfaces.
- Paper stickers: Paper stickers are suitable for smooth, flat surfaces, such as paper, cardboard, and some plastics. They are not as durable as vinyl stickers and may not hold up well in harsh conditions.
- Removable stickers: Removable stickers are designed to be easily removed from surfaces without leaving residue. They are suitable for substrates that are not meant to be permanently marked, such as wallpaper, painted walls, and some plastics.
- Clear stickers: Clear stickers are transparent, allowing the colour and design of the substrate to show through. They are suitable for light-coloured surfaces, such as glass, mirrors, and some plastics.
- Static cling stickers: Static cling stickers use static electricity to adhere to smooth surfaces, such as glass and some plastics. They are easy to remove and can be repositioned multiple times.
Each type of sticker may also have different adhesives, finishes, and printing methods,
which can impact their suitability for different substrates and conditions.
Print bleed is the term used to describe the extension of an image or design beyond the trim edge of a printed piece. This is necessary because printers cannot print perfectly to the edge of the paper. There is always a small margin of error, which can result in a white border around the image if bleed is not used.
Printers need bleed for a few reasons. First, the paper can move slightly during the printing process, which can cause the image to shift slightly. Second, the cutting process can also cause the image to shift slightly. Third, even if the paper and cutting process are perfectly accurate, there is still a small amount of space that needs to be left for the printer's marks.
The amount of bleed that you need will depend on the size of your image and the type of paper that you are using. A good rule of thumb is to use 3mm of bleed for most projects. However, you may need to use more bleed if you are using a thicker paper or if you are printing a very large image. For example, canvas prints need 50mm of bleed to stretch around the frame for a high-quality finish.
When you are creating your design, you can use a bleed guide to help you extend the image beyond the trim edge. You can find bleed guides online or in most design software programs.
Here are the steps on how to create print bleed in your design:
- Open your design file in a design software program.
- Find the bleed guide and add it to your document.
- Extend the image beyond the bleed guide by the amount of bleed that you need.
- Save your file and export it in a format that is compatible with your printer.
Tips for Creating Print Bleed
Here are a few tips for creating print bleed:
- Use a high-resolution image. The higher the resolution, the less likely it is that you
will see any pixelation at the edges of the image. - Use a solid colour for the background. This will help to prevent any white gaps from
appearing around the image. - Preview your design before you send it to the printer. This will help you to make sure
that the bleed is applied correctly.
Target your customers - Never try to appeal to everyone. Focus specifically on those people
you know will benefit from your product/service.
Offer Something Good - Make your offer compelling and relevant to the market you target. How you word your headline will be the primary factor in accurately targeting your offer.
Points of Difference - Knowing what you do well, do differently, do better…. Tell your staff and your customers about the benefits of doing business with you. Loudly.
Include some of these to add credibility:
Guarantees
Testimonials
Professional Printing
Branding
Qualifications/Awards
List of Sponsored Orgs
List of Top 10 Customers
Email/Web Page
Free Trial/Demo
Years Experience
Be the Expert

